08 October 2021

Vegetable Broth - Cooking With Scraps

Instead of throwing out vegetable scraps, leftover vegetables, and other bits and pieces, turn them into a broth to use in your cooking. 

This practice has several benefits. You save money. You produce less that needs to be thrown out. And you know where your food has come from.

Vegetable Broth from Scraps

Watch the video then scroll down for more detailed instructions.


Please note - this article may contain affiliate links. If you click through and make a purchase, I will receive a small compensation at no additional cost to you.

What to Save

Whenever you peel a potato or carrot, when you cut the ends off celery or squash or snap the ends off beans or peas, you probably throw that away. I did for years. Somewhere in my mind, however, I thought there must be a way to use these cast-off bits.


Saving Vegetable Scraps

Image of smiling woman holding a clear plastic bag filled with vegetable scraps.


One way is to save them in the freezer. When you fill a bag or two, you have enough to make the broth. How much you need depends on what size pot you have and how much space you have to store the broth.
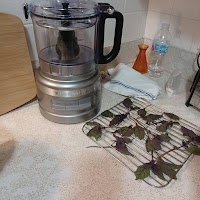


Making the Broth

Stockpot with frozen vegetables in it sits on a stovetop.


Dump saved vegetable scraps into a pot large enough to hold the vegetables and water. Cover and turn to low-to-medium heat. As vegetables begin to thaw, use a spoon to break them apart. Once they are broken apart, add water until about halfway up the side of the pot. 

Silver metal stockpot with lid sits on a stovetop.


Cover and let simmer about 45 minutes. 

Vegetable scraps simmering in a large metal stockpot.


It will look something like this when it is done.

Strain the Broth

Woman holds a metal strainer over a pot as the broth drains into it.


Now it is time to strain the broth. I begin with a large strainer to get the pieces of vegetables and peels. Then I pour it through a finer strainer to catch more bits and pieces.  

The broth in a white bowl with handle.


The broth is now ready to use just as you would any broth you bought. I like to use it to season rice and to make mushroom gravy to serve with pork chops.

Saving the Broth

If you save a bag or two of vegetable scraps, you will get a lot of broth when you make it. To save it, you could can it or you can freeze it, which I prefer.  It is easy to pull out and thaw whenever I need some.

Woman pours broth into a blue freezer tray.


I like to freeze mine in an ice cube tray. When frozen, pop it out and put in a freezer storage bag.

I originally used an ice cube tray, each section holding about 1/3 cup of liquid. I recently purchased a freezer tray from Souper Cubes. I got the 1-cup size, which is the amount I often find I need. I love them, and realize I need a second tray!

Use whatever size container you have available. Be sure to fill it with water to know how much it will hold so you know how many of them you will need when cooking.

That's all there is to it! You can add seasonings when you cook the broth, but I prefer not to so I can season whatever I use it with.

Notes:

I have also found that when you use a lot of celery scraps, it smells overwhelmingly of celery while it is cooking. The taste, however, is not of celery. 

I've read where others suggest NOT using asparagus or tomatoes in a vegetable broth. I've never tried either, so I can't comment. 

When you strain out the vegetables, compost them if you can. They are cooked and should break down fast. 

If you have any questions, leave a comment. If you try it, let me know!

07 October 2021

Homegrown and Homemade - Basil Pesto

 In this episode of Homegrown and Homemade, I make basil pesto!

Pesto from Basil I Grew from Seed

Seed packet for purple opal basil from Baker Creek.
Backstory - in December 2019, I ordered seeds from Baker Creek. In my order they sent a free package of Dark Purple Opal basil seeds. I planted them in the spring of 2020 and they did really well in my garden. I kept saying I was going to make pesto with it, but I didn't own a food processor. I read articles about doing it by hand with a kitchen knife and thought I would give it a try. But I never did.

I planted the basil again this year, and was determined to do more than add the basil to salads and sandwiches. I bought a food processor and within a day was picking basil and making pesto.  

Food processor and basil on a drying rack.

I had more basil than I needed for that batch of pesto, so I put them on a rack to slowly air dry in my oven. 

My basil plant is still producing and I plan to make more pesto, both to eat fresh and to freeze for eating later.  I have planted more seeds and am letting some go to seed to learn if I can keep some going through the winter. 

What is really exciting about this having something else to put on my pasta. I had trouble with acid reflex a few years ago, and one thing I did to help control it was eliminate tomato-based pasta sauces. Since then, I've eaten pasta with a splash of olive oil and some cheese. It is good that way, but I got tired of only that. This summer I started taking fresh tomatoes, bell peppers and some greens from my garden, sautéed them in some olive oil and tossed with pasta and parmesan cheese. And now, I can make pesto and use that as well!

Making the Pesto

I'm reading The Homemade Pantry: 101 Foods You Can Stop Buying and Start Making by Alana Chernila and adapted her recipe. Here's what I did:

Chopped 1/2 cup walnuts in the food processor. 

Added in 1 teaspoon lemon juice and 2 cups packed, fresh basil leaves roughly chopped

Processed until basil leaves were finely minced. 

Sprinkled in garlic powder (fresh garlic can be another trigger to my reflux) and 1/2 teaspoon salt, then turned on processor and poured in 1/2 cup olive oil and processed for a few more seconds. (Basically, I ran it until it looked like I wanted it to.)


Using and Storing the Pesto

Basil pesto in a plastic bowl with a spoon.

I ate some as a dip with crackers, then put the rest in a container, covered with olive oil, and stored in fridge. You can add in grated parmesan cheese when you eat it. You can also put in freezer (without cheese) and store for up to 6 months.

Once the basil in the oven is dry, I'm going to crumble it up and use in recipes as needed.