31 October 2022

Shrimp and Spaghetti - Quick and Easy Recipe

This shrimp and spaghetti meal is quick and easy to pull together. With only a handful of ingredients, you can have it ready to go in no time.

Last week my husband and I were trying to come up with something to have for dinner. We both wanted something "different", meaning, we hadn't eaten it in the last week or so. We each made suggestions when he said "why not do the shrimp and spaghetti thing you do with the Italian dressing."

Sounded good to me, and we were soon eating and enjoying it.

Note: I don't measure when I prepare this, so my amounts are estimates. If you are using leftovers, take what you have and go from there. Experiment and play around with it.

Ingredients

  • Shrimp - I used frozen, raw shrimp; you can also use cook shrimp and this would be a great way to use up leftover shrimp
  • Spaghetti or other pasta your family enjoys - if you have leftover pasta, start with that!
  • Green onion, chopped - regular onion bothers both our stomachs, but green onion makes a good substitute for us
  • Bottled Italian salad dressing - I have never found a homemade version I like better, but if you have one, please send it to me!
  • Butter or oil to cook the shrimp in
  • Salt and pepper
  • Garlic powder (again, garlic bothers both our stomachs, but garlic powder does not so we use it instead)

Instructions

Metal pan on stove with a glass lid. Inside the pan, water is boiling.

Put the water on to boil to cook the spaghetti. 

Cast iron pay with shrimp cooking in butter with a wood spoon for stirring.

Melt butter in a cast iron skillet then add shrimp. Season with pepper and garlic and cook.

Metal pan on stove. There is water and spaghetti noodles in the pan, and a pasta spoon laying next to the pan.

When water comes to a boil, add salt and return to a boil. Add pasta and stir in well so it cooks evenly. 

When shrimp are almost done, stir in the green onion and cook them.

When pasta is cooked, drain well and return to pan. Stir in the shrimp, then pour in some Italian dressing. Do NOT add too much to begin with - add some, stir in well, then add more if needed.

Bowl filled with spaghetti and shrimp on a counter. A pair of glasses in in the upper left corner and a drinking glass in the upper right.

Spoon onto a plate or bowl and top with freshly grated parmesan cheese if desired.

Serving note - I often serve peas or green beans with this, and I usually just mix them in with the pasta, coating the vegetable with the dressing as well. This would be another way to use up leftover vegetables.

Try It Yourself

That's all there is to it! If you have already cooked food, you only need a few minutes to warm things up and put them on a plate. If you cook everything from scratch, as I did, within 45 minutes you can be eating a homecooked meal. 

Give it a try and let me know what you think.

17 October 2022

Hurricane Ian Preparation and Aftermath on the Beachside Homestead

Living a block from the Atlantic Ocean in Florida, we are familiar with preparing for a hurricane. Here is what our urban homestead did to prepare for Hurricane Ian, and what we dealt with after.

In the nine years I've lived in Florida, I have been through several hurricanes and tropical storms. Thanks to my husband, who has lived here longer, we have a good plan to prepare for hurricanes. No plan is perfect; however, it is better than having nothing.

When we were first put in the "cone of uncertainty" by the National Weather Service, I began preparing by printing off my Hurricane Preparation Checklist. (Click to learn how I made mine and do one for your unique needs.)

Then I began pulling out things I needed: flashlights and batteries, candles and lighters, rain gear, and towels to soak up any water that came in. I emptied much of the ice from my ice maker, putting it in bags in the freezer. This has a dual purpose. If we lose power, the ice helps things in the freezer stay frozen longer. If we don't have water, we can melt the ice and use it to drink and cook with.

The garden has to wait until the last minute, so the plants get as much sunlight as possible. Some go into the garage while others are moved to a corner on the patio. The good thing about a container garden is most of the plants are easy to move.

We tied down the awning over the front door, and staked a tied a few of our decorative bushes and fruit trees. Most of the fruit trees I have grown from seed and don't want to lose them.

By the time the rain arrived on Wednesday, we were finished and safely inside.

Watch the video that shows some of the prep work and also the aftermath of Hurricane Ian on our home.

21 September 2022

Protect Your Summer Garden with an Inexpensive DIY Sun Shade

During the heat of summer, a sun shade may protect your garden plants. Here's an inexpensive DIY version that I tried.

Living in gardening zone 9b, I've learned that July and August are not good for growing crops. Even heat loving vegetables can slow or stop producing as the sun that beats down on them daily. No amount of watering can compensate for the brutal sun. 

Shade, however, can offer some relief. Please understand that this won't let you grow crops that northern friends grow with ease during the summer. What it can do is help keep plants alive and prevent damage to produce.

My Garden Needed Relief From The Sun

The off-season for gardening in Florida is the heat of the summer. July and August are not good times to grow things. Plants that produced well during the spring may still be alive, but production is diminished.

My garden is on the patio between my house and garage. It is south facing, and enclosed with a privacy fence and the concrete walls of the garage and house. During the summer, it gets hot in that area.

This year I noticed that my bell peppers, which normally love the summer sun and heat, were getting sunscald. I needed to do something.

One solution is to put up sun shade. The idea intrigued me, but I didn't want to spend a lot of money until I could tell if it helped or not. When I found this article, I knew I had a place to start.

My Sun Shades

I purchased several yards of nylon netting, cut it to (more-or-less) fit over the raised beds, and tied the corners to bamboo sticks inserted in the beds. 

Fenced in area containing raised beds and container plants. Over the raised beds are pieces of nylon net tied to bamboo poles inserted into the raised beds.


Pros

  • It was inexpensive
  • It was easy to set up
  • It was easy to take down when summer storms blow through

Close up of the nylon net tied to a bamboo pole placed in the raised bed.


Cons

  • It didn't cover the entire bed. I will need to get longer bamboo poles and put them in the ground outside the bed for better coverage.
  • It wasn't enough to protect all my plants - my green beans shriveled and died even with the sun shade (to be fair, I planted them much too late so they probably wouldn't have made it anyway)
  • It isn't the prettiest look (although my garden is behind fencing, so only my husband and I see it.

Raised garden bed with nylon mesh over it, held up by bamboo poles.


Overall Impression of my DIY Sun Shades

For taller plants, like my everglades tomato, I need taller poles. This also means that other things may not get enough protection, but careful planning of where I plant in the raised beds could mitigate that.

For other containers, I'm going to have to come up with a way to cover them. 

Will I Use Them Again?

Absolutely! My bell peppers, while still small due to the heat, did not have any more sun scald. 

I plan to buy more nylon netting and cut it to better fit over my raised beds. What I used this year can be cut down to place on container plants. 

I was late putting it up this year - mid-July - and want to try it earlier next summer.

If you notice sun damage on plants in your garden, give this easy and inexpensive DIY sun shade a try and see how it works for you.


02 July 2022

Tour of Zone 9b Urban Garden June 2022

A garden update for June 2022. I live in Zone 9b, Florida, have an urban, container garden.

The garden is going well this year. After taking out the hot tub and putting two raised beds in the space, there is a lot more room to grow things this year.

Which is good because my husband made a trip to Home Depot in March and came back with six bell pepper plants and six tomato plants of different varieties! The peppers went in one of the beds, while I continue to put tomatoes in smaller containers so they can be moved around. They don't do well under the worst of the Florida sun and I try to find places with a bit of shade for them.

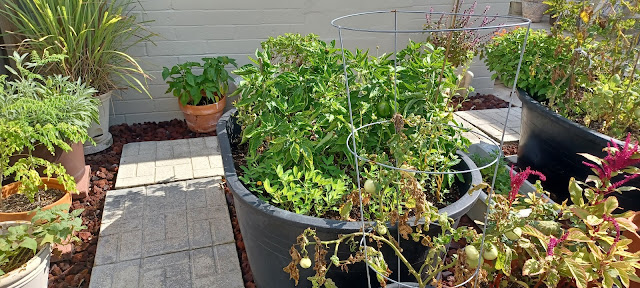
Here's what the garden looks like in June 2022.

 
You can see much of the garden in this photo. In the raised bed nearest the camera, the flowering plant hanging over is a penta. There were two of them and they outgrew the space, so I moved one to the other raised bed.
 
In the tomato cage are a couple of everglades tomatoes. You may not be familiar with that variety. They are very small - smaller than a cherry tomato - but they do well in the Florida heat and humidity. I planted the seeds last fall, but they didn't germinate until earlier this year. I often pick 6-8 a day and find them a fun snack or addition to a salad.
 
There is also some celery in there. I planted it last fall and it did not do much, and I am shocked it has not completely died in the heat. Hasn't gotten big enough to really do anything with other than add flavor to cooked dishes, but I still have seeds and will try again this fall.
 
At the far end green beans trying to grow. I've had pretty good luck growing them in containers, but the ones I planted earlier this year in the raised bed did not do well. I realized that in this size raised bed, they need more water. That has helped, but I believe I need to get some shade cloth for them as well.  

The container with the blooming flowers next to the wall is Purple Opal Basil. I received the seeds free with an order from Baker Creek in 2020 and have been thrilled how well it grows here.


On the other side are containers with bell peppers I grew from seed, turmeric, amaranth with some of the tomatoes my husband bought, and a couple of the hanging baskets that were on the ground for a good watering.

Between the beds is a container with New Zealand spinach. This is not a true spinach, but a green that does grow well in my climate. I try to sow seeds every month or so to enjoy these in salads and on sandwiches. You can't tell, but there are also three loquat trees in there. I sprouted the seeds this spring, and am going to move them to larger containers.

Loquat is also known as Japanese Plum. The fruit is smaller than most plums, and has several large seeds in it. It blooms in January and the fruit is ready to pick in February and March.

I sprouted a seed about five years ago. That tree is over five feet tall and I am looking for a place to plant it in our yard.


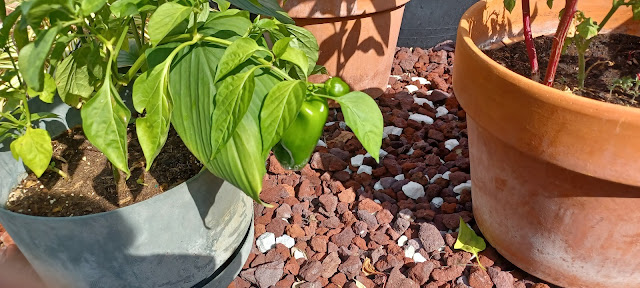
Close up of a bell pepper on one of the plants I grew from seed.
 

The other raised bed is where I planted the six pepper plants my husband bought. They have done fantastic! The first peppers I harvested were from the plants I grew from seed, but these have surpassed them. We are about to the point of calling friends and asking if they want any, as well as freezing some. We made stuffed peppers last weekend using peppers we grew. Very satisfying.

I also grow purslane in that bed, another green I add to salads and put on sandwiches, as well as calendula and a few coreopsis that grew from seeds left from last year's plant.

And, I have peanuts growing in there! This wasn't what I had planned, but when neighbors put out peanuts for the squirrels, who then bury them in my garden, what can I do? If the peanut sprouts, I put it in the bed. I did this last year in a couple of small containers and actually grew peanuts. 

Wouldn't it be fun to make my own peanut butter from peanuts I grew?!?


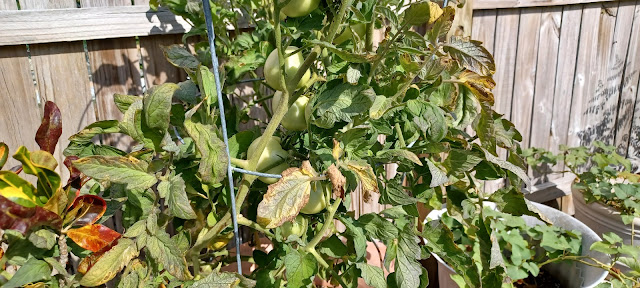
One of the tomato plants my husband bought. It has done really well, and there are 8-10 tomatoes on there. I have already harvested a few as they have begun to turn color. As you can tell from the leaves, it is getting stressed in the Florida summer sun. Once I pick the tomatoes on there, I'll pull the plant.
 
NOTE: When should you harvest tomatoes? I always thought you should leave them on the vine until they are red and fully ripe. As tomatoes began turning this year, I lost a number of them to some critter or critters who would peck a hole or take a bite. This was only in the containers that had cages on them, so I think they were using the cage to get to them. 
 
To get more of my harvest, I began to pick them as soon as they were obviously changing color and let them ripen in front of a window.
 
Then I came across this Reel on Instagram on the best time to pick tomatoes. Turns out, I was doing the right thing! 
 
Who knew vine-ripened was just a marketing ploy? 


Along the west fence are (from the back) lemongrass, sage, moringa, and two containers with sweet potatoes.

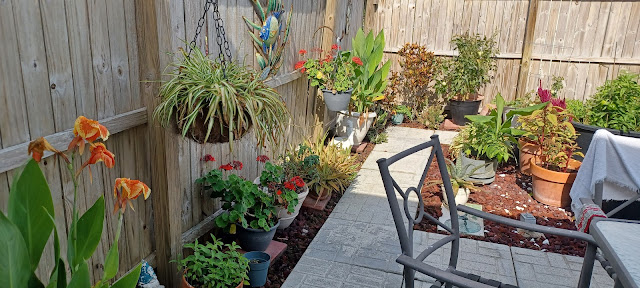
Along this side of the fence are mainly ornamental and flowering plants - cannas, aloe vera, geraniums, and more hanging baskets of airplane plants.

Summer has definitely arrived here. In fact, it arrived in mid-May, which is early for us. So far, most things are hanging in there - the bell peppers thrive in this weather - but the next month will see the last of these tomato plants. Hopefully the green beans will come through. I'm going to buy some nylon netting to use as a shade cloth during the heat of the day. Once I set that up and see how it works, I'll have a post on that.

How is your garden growing this time of year?

Have you downloaded my free Plant Information Sheet? Print out as many copies as you need so you can record the growing, harvesting, and using information for everything you grow. Click here to learn more and get your copy.